
If you work in sales, there is a good chance that you use SalesForce to monitor your activities and manage your customer relationships. Being able to access org charts for the companies that your customers work for provides a lot of benefits to any organization. Before any large enterprise sale, there is often multiple contacts within a given company before the sale is finalized. Understanding the structure of the company that you are working with is critical for helping these sales conversations to go smoothly.
Although we have covered this topic in the past, a new version of the SalesForce software was recently released that altered the way you can add Organimi’s Salesforce Org Charts to contacts and companies within the SalesForce system. Here, we’ll go over all of the steps that you need to take to add a SalesForce Org Chart to their profile.
Step #1: Adding Custom Fields to SalesForce Customer Profiles
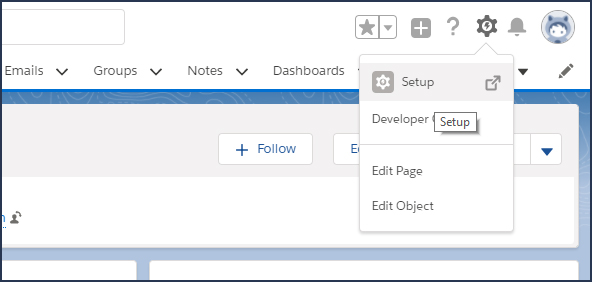
In the upper right-hand corner of your page, next to your profile avatar, you’ll find the cog icon that gives you access to various settings on the page. Click the icon. In the drop-down menu that appears, click the “Setup” page. This will open a new window.
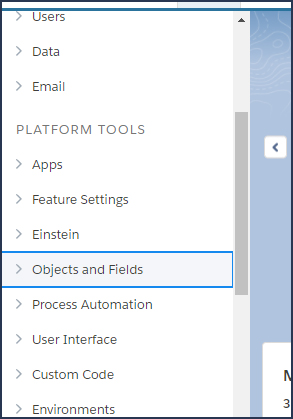
Once you reach that page, take a look at the menu to the left-hand side. Scroll down the page until you see the “PLATFORM TOOLS” menu. Inside of that menu, click on “Objects and Fields.” This will open a sub-menu.
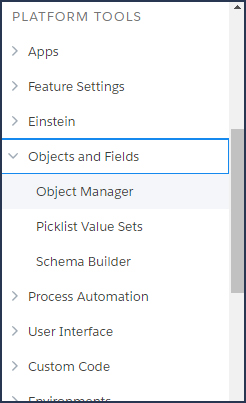
In the sub-menu, select “Object Manager.” This will open a page that includes all of the different “objects” (think data fields) associated with your SalesForce software account. A lot of the data in here is critical for your software to function correctly, so don’t change anything unless you have an understanding of what you are doing. Make sure to follow the next steps very carefully.
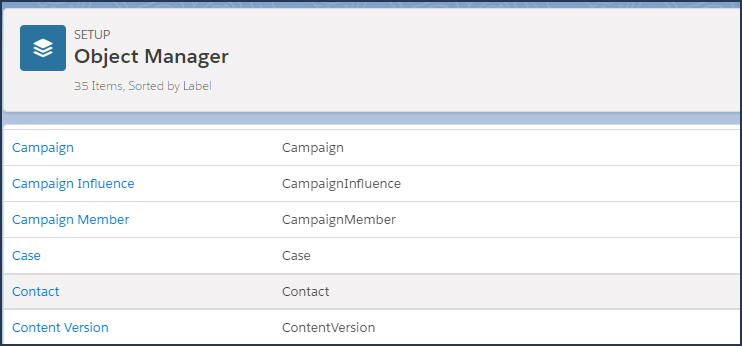
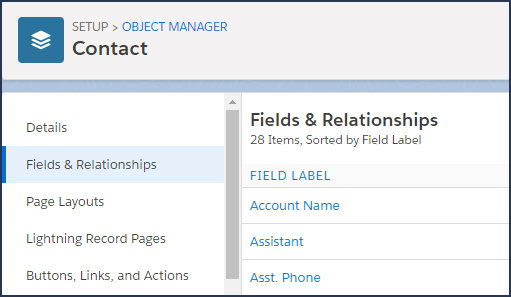
Once you open up the “Object Manager” page, scroll down through the list of different objects on the page. When you reach “Contact,” select it. This will open up all information associated with the contacts within your SalesForce account, which is where we will be adding the Org Chart custom field.
After selecting the “Contact” page, there will be a menu on the left-hand side of the page. There, select “Fields & Relationships.” This page features all of the different data fields that are present on contact profile pages. It’s here that we will be adding the custom field.
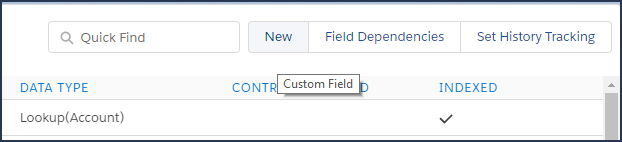
On this page, in the upper right side of the screen above the different data fields, you will see a button that says “New.” Clicking this button will let us create a new data field on the contact profile page. Click the “New” button, and you will be taken to a new page with information that you are required to fill out to create a new custom field.
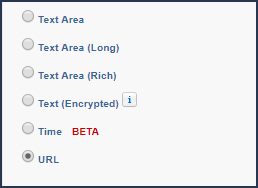
The first setting that we have to set for our custom field is the data type of the field. Essentially, this tells the system how much data and what kind of data the new field will hold. For the purposes of this demonstration, you can choose “URL” from the selection box. This will ensure that the link that you paste into the profile is clickable at the end of this tutorial. However, you can also select “Text Area” if you just wish to store the URL. When you are done, click “Next” to go to the next setting page.
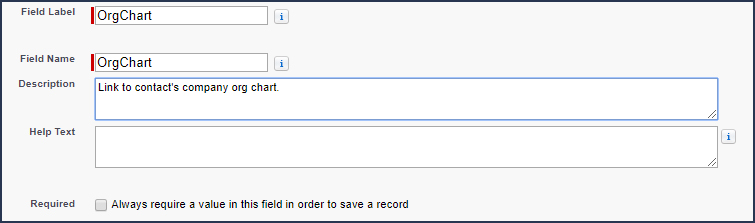
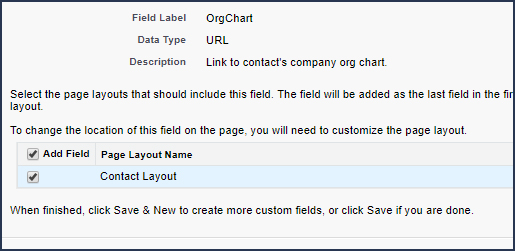
On the second settings page, we have more information that we have to fill out about the custom field. Since we are creating a field to store an org chart URL, we will use the term “OrgChart” for both the field label and field name. This keeps things simple and makes information easier to find at a later date. You can also fill out the “Help Text,” which is the text that SalesForce will display when a user hovers over the information button to the right of the textbox. When you are done on this page, click the “Next” button to be taken to the final settings page in the process of creating a new custom field.
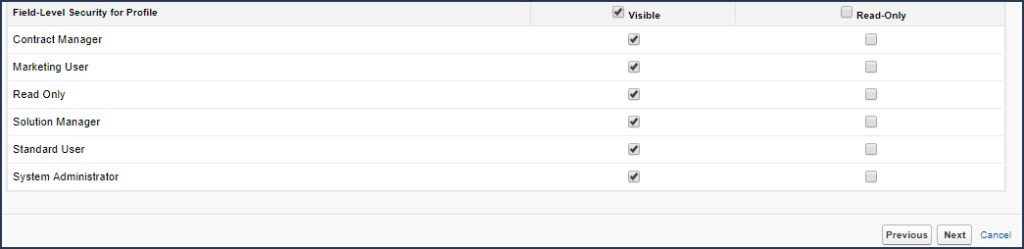
This page has all of the necessary information about permissions regarding the new text field. For our purposes, we don’t need to make any changes and the default settings will do just fine. Make sure your page looks just like the example below, and then click the “Next” button.
This page asks us where we want the custom field to appear. Since we are editing the “Contact” object, it gives us “Contact Layout” by default. This is exactly where we want the custom field to show up, so we don’t need to make any changes on this page. Remember, the process can be duplicated for other areas within the SalesForce system. Companies, for example, would be another great place to place a sales org chart link for future reference.
When finished, click the “Save” button. This will save the custom field and add it to the “Contact” page. Remember, you may have to refresh a contact profile before the new field will show up.
Step #2: Creating a Public Org Chart Link in Organimi
Now that you have added the org chart custom field to your SalesForce customer profile pages, we have to create a public org chart link that we can place in the profile.
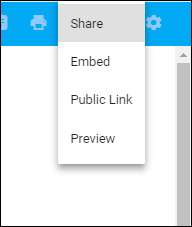
To do this, click on the “Sharing” icon on the top right of your Organimi dashboard. This will open a drop down menu that gives you several options. The option that we want to select is “Public Link,” as this option will create a link that we can then paste into the SalesForce profile page.
If your Organimi org chart is not already public, the system will prompt you to make the chart public. Go ahead and select “Make Chart Public” to grant the appropriate permissions to generate the public link.

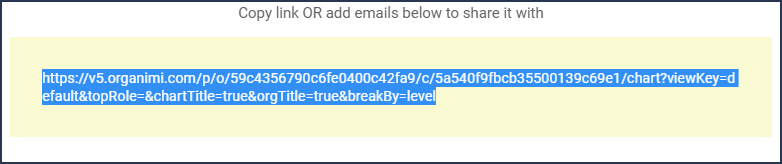
Once you’ve made your Org Chart Public, a link will be generated that allows anyone to access the org chart. In the settings, you can decide whether the people that access this chart can only read the chart, or if they have the ability to edit it as well. Copy the link that is generated so that we can add it to the SalesForce customer profile.
Step #3: Adding the Org Chart to SalesForce
Almost done! Now we can add the org chart link to the SalesForce profile of our choosing. Open up your SalesForce account and navigate to the chosen customer profile. In the upper-right hand of the profile screen, you’ll see a button named “Edit,” that will allow us to edit the profile of the particular customer. Click on it.

You should see all of the different fields associated with the customer contact page on this screen. Scroll down until you find the “OrgChart” field, which should be located at the bottom of the page. In the text box, paste the Organimi public org chart link, then save the profile.

When you access that customer’s profile page, you should see a clickable org chart link at the bottom of their “Details” section. This will open up the Organimi Org Chart in a new window.

This is a simple but effective way to add Salesforce org chart fields to your account and ensure that you have a way to connect org charts to each of your customers.