
This is a common question that our customers at Organimi ask us often. In this article, we’ll cover a few quick and easy ways for you to convert a CSV file into an Excel file, complete with full columns in a single workbook. Additionally, we’ll provide some basic advice for how to handle issues when they arise, such as if the CSV file isn’t correctly displaying within the columns of the Excel sheet.
If you need to transfer data from a CSV file to an Excel workbook, it can be an annoying problem. Often, we’ll have customers of ours that attempt to do so but end up with all sorts of errors and formatting issues that they did not account for.
First, we’ll start by showing you how to open a CSV file in Excel. This is the simplest and most resistance-free way to open CSV data in an Excel worksheet.
How to Open a CSV File in Excel
If you created a CSV file in another program or database software and would like to open it in Excel, you’re in luck! You can still open it as an Excel Workbook using the “Open” command in the “File” menu. However, there are some special considerations that you need to take into account when you open it.
Keep in mind that opening a CSV file in Excel doesn’t actually change the file format. It just allows you to open your CSV file in the program and view the contents. There are other steps that you will have to take in order to create the full conversion.
Step #1 — Open Microsoft Excel
Step #2 — Go to the “File” tap and click on “Open.”
Step #3 — This will open the Open dialog box. When you see that pop up, select “Text Files (*.prn,*.txt,*.csv) from the drop-down list. This list will be visible in the lower right-hand corner of the box.
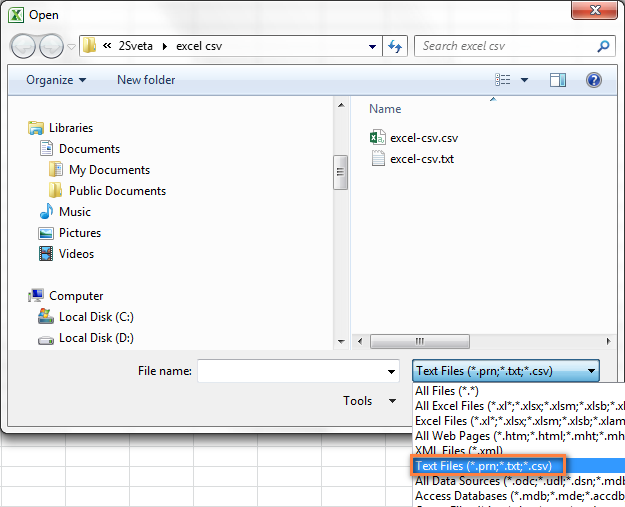
Step #4 — Browse through your files to locate the CSV file. Open it by double clicking on the file.
Once you have opened the file, Excel will try to open the file immediately. In the case of a .csv file, Excel should be able to open it and important the data into a new workbook without any problems.
If you are opening a .txt file, you’ll have to go through the Import Text Wizard for the data to be located correctly.
When Microsoft Excel opens your .csv file, it will use all of the default data from the settings to understand how to import the file and assign data to each of the columns in the workbook. If you data has different formatting than the defaults within the program, you will have to use the Import Text Wizard instead.
Issues that can arise in this process that would require you to use the Import Text Wizard include:
- Different delimiters used to separate the different data fields from one another.
- The .csv file has a different format for dates that Excel can not read with default settings.
- You have converted numbers with leading zeroes and would like to preserve those leading zeroes when you load it into the Excel sheet.
- You would like to see a preview of how the data will look once it has been loaded into Excel
- You would like to play around with the options to see what other options are available within the wizard.
Excel will automatically open the Import Text Wizard screen for any file ending in the .txt extension. You can change the filetype of your document from .csv to .txt to get the screen to open if you would like.
How to Import CSV to Excel
There are other options for importing CSV data into Excel as well. You can use this method to import the data contained in the CSV file into a new Excel Worksheet. This method is different because it does not open the file in Excel but actually converts the .csv file to .xlsx or .xls, depending on your version of Excel.
If you would like to import CSV files to Excel, follow these steps:
Step #1 — With the Excel spreadsheet open, click on the cell where you would like to import the data from the .csv. In many cases, this will be cell A1.
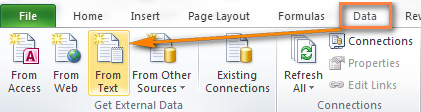
Step #2 — On the “Data” tab, go to the “Get External Data” group, and click “From Text.”
Step #3 — Find the .csv file in your system that you would like to import. Then click the “Import” button, or double click the file in the window.

Step #4 — Now, the “Text Import Wizard” will appear. Follow the steps that are provided on the screen based on how the information in your .csv file is laid out. Then we choose the delimiter information that we will use to help Excel import the .csv data. The delimiter is the character that is used to separate data fields in your .CSV file. The most commonly used .csv delimiter is the comma.
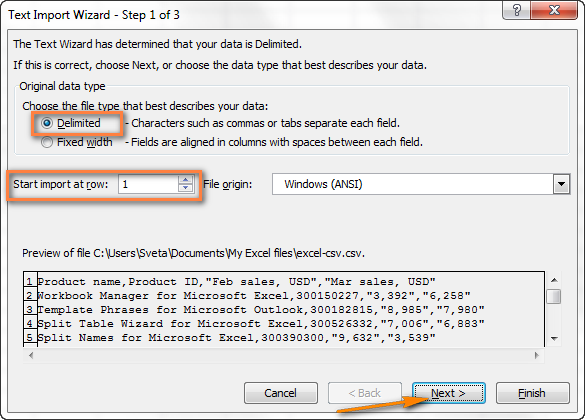 Followed by:
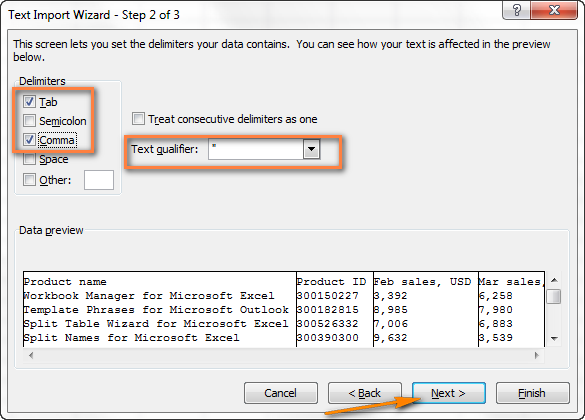
Notice how this screen provides you with a preview of the data that you can use to ensure that you are importing the data correctly, using the right delimiters.
Step #5 — Choose the destination for importing the information. This will be a cell in an existing or new worksheet. Click “OK” to finish, and you’re done importing!
Converting CSV to Excel
Converting a CSV file to an Excel (XLS) file is a relatively simple process using these two methods. These present the easiest and most straightforward ways to pull CSV data into an Excel workbook.
Creating CSV or Excel File for Import into Organimi
Organimi allows you to import any CSV or Excel file for creation of your org chart. To get started on creating a CSV file for import the CSV file must contain these columns (in any order)
- ID
- First Name
- Last Name
- Boss ID*
*You can create a “Boss ID” column that outlines reporting relationships based on IDs or you can leave the Boss ID for the topmost role (i.e. CEO) blank.

Tips:
- Ensure that the file contains the following columns: ID, First Name, Last Name, and when you use these columns shown above, Organimi automatically creates the org chart structure
- Ensure that row 1 (the top row) consist of column headings
- Place the top role (i.e. CEO or President) in row 2 directly below the column headings. Notice that the first cell under the heading Boss ID is intentionally left blank
- Ensure you include a column for the email address, as this is used as an identifier, and is important if you wish to re-upload the CSV file again to update your roster information (and chart
- Avoid having blank rows between names.
- Separate multiple role IDs in the Dottedids column with a colon
You can import a sample CSV file here. For more information on CSV to Excel, please visit our help centre for more information.
Import A CSV File into Organimi
- From your organization’s dashboard, click the BULK IMPORT button.
- Click the ROSTER + CHART button
- Click IMPORT A NEW CHART
- Drag and drop the Excel/CSV file into the grey box or click the grey tile to select the filefrom your ocmputer
- Click the NEXT button
- Review and select all column names that match the corresponding field data names
- Click the NEXT button
- Click FINISH
For a more thorough step-by-step, please visit our help centre document on Importing a CSV file into Organimi